플렉스박스 레이아웃이란?
플렉스박스 레이아웃(flexbox layout)이란 flex 컨테이너가 될 요소에 display:flex 설정 후 그 안에 자식 콘텐츠 아이템을 배치하는 것을 의미한다. 플렉스 컨테이너는 콘텐츠 아이템의 inline과 block의 성질을 완전히 무시한다.
테일윈드CSS에서는 flex 클래스를 지원한다.
flex-direction 스타일 속성
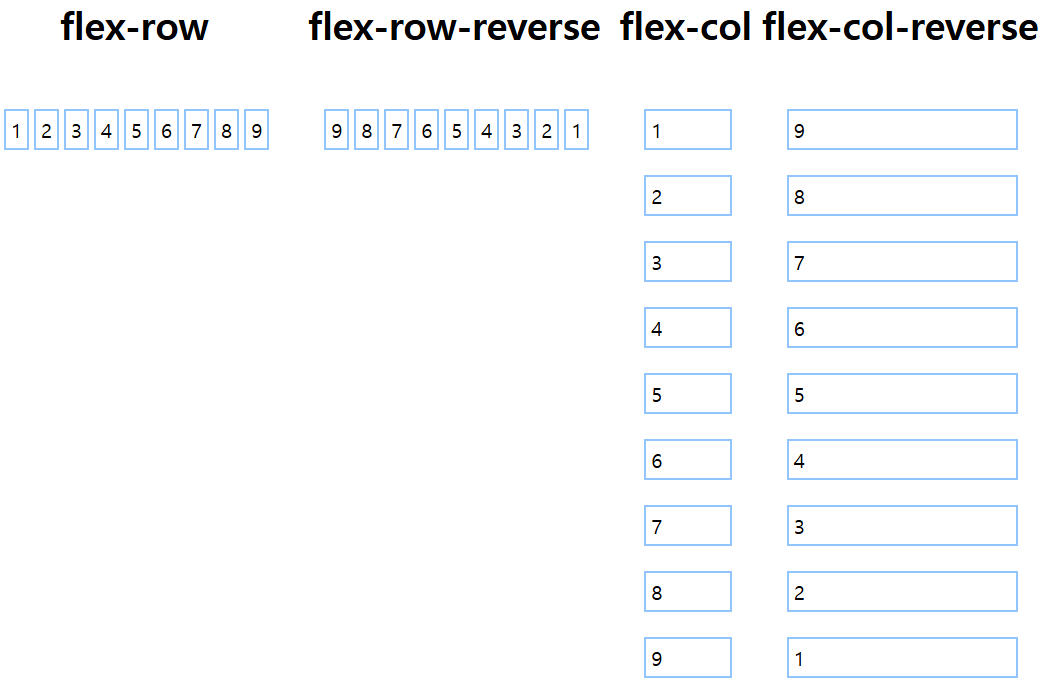
CSS에서는 flex-direction 속성을 제공하며 display 설정값이 flex일 경우에만 사용할 수 있다. flexdirection의 설정값은 row, row-reverse, column, column-reverse 등이 있으며 기본값은 row이다. 테일윈드CSS는 flex-direction 설정값에 대응하는 클래스를 제공한다.
| 클래스 이름 | 의미 | 설명 |
| flex-row | flex-direction: row; | 수평으로 배치하며 과거순으로 순차적으로 배치한다. |
| flex-row-reverse | flex-direction: row-reverse; | 수평으로 배치하며 최신순으로 순차적으롭 배치한다. |
| flex-col | flex-direction: column; | 수직으로 배치하며 과거순으로 순차적 배치한다. |
| flex-col-reverse | flex-direction: column-reverse; | 수직으로 배치하며 최신순으로 순차적 배치한다. |
import {Title, Div, SubTitle} from "../components"
import * as D from "../data"

export default function DirectionTest() {
  const boxes = D.range(1, 9 + 1).map(number => {
    return (
      <p key={number} className={`border-2 border-solid border-blue-300 p-1 mt-1 ml-1`}>
        {number}
      </p>
    )
  })
  return (
    <section className="mt-4">
      <Title>DirectionTest</Title>
      <Div className="flex flex-row mt-4">
        <Div className="mr-2">
          <SubTitle>flex-row</SubTitle>
          <Div className="flex flex-row p-4">{boxes}</Div>
        </Div>
        <Div className="mr-2">
          <SubTitle>flex-row-reverse</SubTitle>
          <Div className="flex flex-row-reverse p-4">{boxes}</Div>
        </Div>
        <Div className="mr-2">
          <SubTitle>flex-col</SubTitle>
          <Div className="flex flex-col p-4">{boxes}</Div>
        </Div>
        <Div className="mr-2">
          <SubTitle>flex-col-reverse</SubTitle>
          <Div className="flex flex-col-reverse p-4">{boxes}</Div>
        </Div>
      </Div>
    </section>
  )
}
Overflow 스타일 속성
CSS의 flex-wrap은 콘텐츠를 수평으로 배치하다 더 이상 배치가 어려울 때 자동으로 다음줄로 배치되게 한다.
테일윈드CSS도 해당 스타일을 사용할 수 있는 클래스를 제공한다.
| 클래스 이름 | 의미 | 설명 |
| flex-wrap | flex-wrap: wrap; | 콘텐츠를 왼쪽부터 수평배치하다 아래로 줄바꿈 배치한다. |
| flex-wrap-reverse | flex-wrap: wrap-reverse; | 콘텐츠를 왼쪽부터 수평배치하다 위로 줄바꿈하여 배치한다. |
| flex-nowrap | flex-wrap: nowrap; | 수평 방향 여백이 없으므로 일부 콘텐츠 요소가 화면에 표시되지 않으며 콘테이너 바깥 영역에서 보이지 않도록 overflow 스타일 속성 값을 hidden으로 설정해야 한다. |
import {Title, SubTitle, Div} from "../components"
import * as D from "../data"
export default function WrapTest() {
  const boxes = D.range(1, 30 + 1).map(number => {
    return (
      <p key={number} className={`border-2 border-solid border-blue-300 p-1 mt-1 ml-1`}>
        {number}
      </p>
    )
  })
  return (
    <div className="mt-4">
      <Title>WrapTest</Title>
      <Div className="flex flex-col w-1/2 mt-4 bg-gray-200">
        <Div className="mt-2">
          <SubTitle>flex-row flex-wrap</SubTitle>
          <Div className="flex flex-row flex-wrap p-4">{boxes}</Div>
        </Div>
        <Div className="mt-2">
          <SubTitle>flex-row flex-wrap-reverse</SubTitle>
          <Div className="flex flex-row flex-wrap-reverse p-4">{boxes}</Div>
        </Div>
        <Div className="mt-2">
          <SubTitle>flex-row flex-wrap</SubTitle>
          <Div className="flex flex-row p-4 overflow-hidden flex-nowrap">{boxes}</Div>
        </Div>
      </Div>

      <Div className="flex flex-row mt-4 bg-gray-200">
        <Div className="mr-8">
          <SubTitle>flex-Column flex-wrap</SubTitle>
          <Div className="flex flex-col flex-wrap h-40 p-4 min-h-40">{boxes}</Div>
        </Div>
        <Div className="mr-8">
          <SubTitle>flex-Column flex-wrap-reverse</SubTitle>
          <Div className="flex flex-col flex-wrap-reverse h-40 p-4 min-h-40">{boxes}</Div>
        </Div>
        <Div className="mr-8">
          <SubTitle>flex-Column flex-wrap</SubTitle>
          <Div className="flex flex-col h-40 p-4 overflow-hidden flex-nowrap min-h-40">
            {boxes}
          </Div>
        </Div>
      </Div>
    </div>
  )
}

min-width와 max-width 스타일 속성
css는 부모 컨테이너의 크기에 대응하기 위해 콘텐츠의 최소, 최대 크기를 설정하는 min-width, max-width, min-height, max-height가 있으며 테일윈드CSS는 min-w-숫자, max-w-숫자, min-h-숫자, max-h-숫자 클래스를 제공한다.
해당 속성들을 적용하기 위한 type을 선언한다.
export type MinMaxWidthHeight = {
  minwidth?: string
  maxWidth?: string
  minHeight?: string
  maxHeight?: string
}
타입을 Div 컴포넌트에 적용한다.
import {FC, DetailedHTMLProps, HTMLAttributes, PropsWithChildren} from "react"
import {WidthHeight} from "./WidthHeight"
import {leftRightTopBottom} from "./LeftRightTopBottom"
import {MinMaxWidthHeight} from "./MinMaxWidthHeight"

export type ReactDivProps = DetailedHTMLProps<
  HTMLAttributes<HTMLDivElement>,
  HTMLDivElement
>
export type DivProps = ReactDivProps &
  PropsWithChildren<WidthHeight> &
  leftRightTopBottom &
  MinMaxWidthHeight & {
    src?: string
  }

// prettier-ignore
export const Div: FC<DivProps> = ({
  width, height, style: _style, src, className: _className,
  left, right, top, bottom, minwidth, maxWidth, minHeight, maxHeight,
  ...props
}) => {
  const style = {
    ..._style, width, height, backgroundImage: src && `url(${src})`,
    left, right, top, bottom,
    minwidth, maxWidth, minHeight, maxHeight
  }
  // bg-gray-300는 이미지 로딩 실패를 알 수 있게 함
  const className = ['box-sizing', src && 'bg-gray-300', _className].join(' ')
  return <div {...props} className={className} style={style} />
}
적용된 Div 컴포넌트를 통한 minMaxWidthHeight 속성을 사용할 소스를 추가한다.
import {Title, Div} from "../components"
import * as D from "../data"

export default function MinmaxTest() {
  return (
    <section className="mt-4">
      <Title>MinmaxTest</Title>
      <Div src={D.randomImage(800, 300)} className="bg-cover">
        <Div className="w-1/2 bg-blue-500 h-80" minwidth="300px" maxWidth="500px" />
      </Div>
    </section>
  )
}

justify-content와 align-items 스타일 속성
CSS에서 부모 컨테이너를 display: flex;로 설정값 입력 시 컨테이녀 영역 내부의 자식 콘텐츠를 구성하는 요소들을
조정(alignment)할 수 있지만 조정 시 방향을 구분해야 한다.
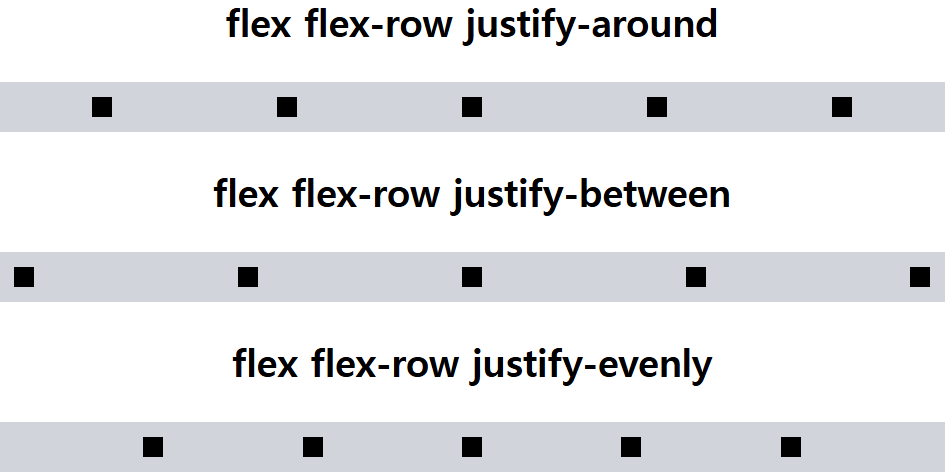
이럴때 justify-conetnt속성을 이용해 플렉스 컨테이너의 콘텐츠 요소들을 수평으로 조정하며 속성값은 flex-start,
flex-end, center, space-between, space-around, space-evenly가 있으며 기본값은 flex-start이다.
수직으로 조정하기 위해서는 align-items 스타일 속성을 사용하며 속성값은 flex-start, flex-end, center, baseline, stretch가 있고 기본값은 flex-start이다.
테일윈드CSS는 justify-content, align-items 두 속성을 사용할 수 있는 클래스를 제공한다.
| 클래스 이름 | 의미 |
| justify-start | justify-content : flex-start; |
| justify-end | justify-content : flex-end; |
| justify-center | justify-content : center; |
| justify-between | justify-content : space-between; |
| justify-around | justify-content : space-around; |
| justify-evenly | justify-content : cpace-evenly; |
| items-start | align-items: flex-start; |
| items-end | align-items: flex-end; |
| items-center | align-items: center; |
| items-baseline | align-items: baseline; |
| items-stretch | align-items: stretch; |
import {Title, Div, SubTitle} from "../components"
import * as D from "../data"
export default function JustifyCenterTest() {
  const boxes = D.range(0, 5).map(index => (
    <Div key={index} className="w-4 h-4 m-1 bg-black" minHeight="auto" />
  ))
  return (
    <section className="mt-4">
      <Title>JustifyCenterTest</Title>
      <div className="mt-4">
        <SubTitle>flex flex-row justify-center</SubTitle>
        <div className="flex flex-row justify-center h-40 bg-gray-300">{boxes}</div>
      </div>
      <div className="mt-4">
        <SubTitle>flex flex-col justify-center</SubTitle>
        <div className="flex flex-col justify-center h-40 bg-gray-300">{boxes}</div>
      </div>
    </section>
  )
}


위 속성을 제외한 속성들의 결과물을 확인하기 위한 소스를 추가한다.
import {Title, SubTitle} from "../components"
import * as D from "../data"

export default function AlignTest() {
  const boxes = D.range(0, 5).map(index => {
    return <div key={index} className="w-4 h-4 m-1 bg-black" />
  })
  const boxesForStretch = D.range(0, 10).map(index => {
    return <div key={index} className="w-4 m-4 bg-black" />
  })
  // prettier-ignore
  const justifies = ['justify-start', 'justify-center', 'justify-end', 'justify-around', 'justify-between', 'justify-evenly'].map(justify => (
    <div key={justify} className="mt-4">
      <SubTitle>flex flex-row {justify}</SubTitle>
      <div className={`flex flex-row ${justify} p-2 bg-gray-300`}>{boxes}</div>
    </div>
  ))

  const items = ["items-start", "items-center", "items-end"].map(item => (
    <div key={item} className="ml-4 mt-p-2">
      <SubTitle>flex flex-row {item}</SubTitle>
      <div className={`flex flex-row ${item} h-20 bg-gray-300`}>{boxes}</div>
    </div>
  ))
  return (
    <section className="mt-4">
      <Title>AlignTest</Title>
      {justifies}
      {items}
      <div className="p-2 mt-4">
        <SubTitle>flex flex-row items-strectch</SubTitle>
        <div className="flex flex-row items-stretch h-20 bg-gray-300">
          {boxesForStretch}
        </div>
      </div>
    </section>
  )
}


User 컴포넌트 만들기
플렉스 레이아웃 기능을 바탕으로 User 컴포넌트를 구현하기 위해 우선 사용자 데이터를 만든다.
import * as C from "./chance"
import * as I from "./image"

export type IUser = {
  uuid: string
  name: string
  jobTitle: string
  email: string
  avatar: string
}

// prettier-ignore
export const makeUser = (
  uuid: string, name:string, jobTitle:string, email:string, avatar:string
):IUser => ({uuid, name, jobTitle, email, avatar})

export const makeRandomUser = (): IUser =>
  makeUser(
    C.randomUUID(),
    C.randomName(),
    C.randomJobTitle(),
    C.randomEmail(),
    I.randomAvatar()
  )
만든 데이터를 통해 User 컴포넌트를 구현하며 해당 컴포넌트에는 flex 속성값을 사용한다.
import type {FC} from "react"
import type {DivProps} from "../components"
import * as D from "../data"
import {Div, Avatar} from "../components"

export type UserProps = DivProps & {
  user: D.IUser
}

const User: FC<UserProps> = ({user, ...props}) => {
  const {name, email, jobTitle, avatar} = user
  return (
    <Div {...props}>
      <div className="flex p-2">
        <Avatar src={avatar} size="2rem" />
        <div className="ml-2">
          <p className="font-bold">{name}</p>
          <p className="text-gray-500 line-clamp-1">{jobTitle}</p>
          <p className="text-blue-500 underline">{email}</p>
        </div>
      </div>
    </Div>
  )
}
export default User
앞선 User컴포넌트에서 Div로 요소를 감싸준 후 UserContainer 관점에서 필요 스타일링을 추가한 소스를 추가한다.
import {Title} from "../components"
import * as D from "../data"
import User from "./User"

export default function UserContainer() {
  const children = D.makeArray(10)
    .map(D.makeRandomUser)
    .map(user => (
      <User
        key={user.uuid}
        user={user}
        className="m-2 text-xs border-2 border-blue-300 border-solid rounded-lg"
        minWidth="15rem"
        width="15rem"
      />
    ))
  return (
    <section className="mt-4">
      <Title>UserContainer</Title>
      <div className="flex items-center justify-center p-4 mt-4 flex-warp">
        {children}
      </div>
    </section>
  )
}
Card 컴포넌트 만들기
User컴포넌트를 확장 해 Card 컴포넌트를 생성하자. 우선적으로 Card 데이터를 생성한다.
import type {IUser} from "./User"
import {makeRandomUser} from "./User"
import * as C from "./chance"
import * as I from "./image"
import * as D from "./date"

export type ICard = {
  uuid: string
  writer: IUser
  image: string
  title: string
  paragraphs: string
  dayMonthYearDate: string
  relativeDate: string | null
}

export const makeCard = (
  uuid: string,
  writer: IUser,
  image: string,
  title: string,
  paragraphs: string,
  dayMonthYearDate: string,
  relativeDate: string | null
): ICard => ({uuid, writer, image, title, paragraphs, dayMonthYearDate, relativeDate})

export const makeRandomCard = () => {
  const date = D.makeRandomPastDate()
  return makeCard(
    C.randomUUID(),
    makeRandomUser(),
    I.randomImage(800, 600),
    C.randomTitleText(),
    C.randomParagraphs(5),
    D.makeDayMonthYear(date),
    D.makeRelativeDate(date)
  )
}
데이터 생성 후 Card컴포넌트 소스를 추가한다.
import {FC} from "react"
import {DivProps} from "../components"
import {Div} from "../components"
import * as D from "../data"
import User from "./User"

export type CardProps = DivProps & {
  card: D.ICard
}

const Card: FC<CardProps> = ({card, ...props}) => {
  const {writer, image, title, paragraphs, dayMonthYearDate, relativeDate} = card
  return (
    <Div {...props}>
      <div className="flex flex-col">
        <User user={writer} className="mt-2" />
      </div>
    </Div>
  )
}

export default Card
그 후 앞서 구현한 UserContainer의 구조와 유사한 CardContainer.tsx 소스를 추가하자.
import {Title} from "../components"
import * as D from "../data"
import User from "./Card"

export default function CardContainer() {
  const children = D.makeArray(10)
    .map(D.makeRandomCard)
    .map(card => (
      <User
        key={card.uuid}
        card={card}
        className="m-2 overflow-hidden text-xs border-2 shadow-lg rounded-xl"
        minWidth="30rem"
        width="30rem"
      />
    ))
  return (
    <section className="mt-4">
      <Title>CardContainer</Title>
      <div className="flex flex-wrap justify-center p-4 m-4 item-center">{children}</div>
    </section>
  )
}
카드 속성에 디자인 요소를 좀더 가미해서 소스를 변경한다.
import {FC} from "react"
import {DivProps} from "../components"
import {Div, Icon} from "../components"
import * as D from "../data"
import User from "./User"

export type CardProps = DivProps & {
  card: D.ICard
}

const Card: FC<CardProps> = ({card, ...props}) => {
  const {writer, image, title, paragraphs, dayMonthYearDate, relativeDate} = card
  const Icons = ["home", "search", "settings", "favorite"].map(name => (
    <Icon key={name} name={name} className="mr-2 text-3xl" />
  ))
  return (
    <Div {...props}>
      <div className="flex flex-col">
        <Div src={image} className="h-60" />
        <Div className="p-4" minHeight="16rem" height="16rem" maxHeight="16rem">
          <p className="mt-2 text-3xl text-center text-bold">{title}</p>
          <Div className="flex justify-between">
            <User user={writer} className="mt-2" />
            <Div className="mt-2">
              <p className="text-gray-500">{relativeDate}</p>
              <p className="text-gray-500">{dayMonthYearDate}</p>
            </Div>
          </Div>
          <p className="mt-2 line-clamp-4">{paragraphs}</p>
        </Div>
        <Div className="flex flex-row items-center justify-between p-2 mt-2 text-red-500 ">
          {Icons}
        </Div>
      </div>
    </Div>
  )
}

export default Card
'FrontEnd > React' 카테고리의 다른 글
| [React] 처음 만나는 리액트 훅 (0) | 2024.11.26 |
|---|---|
| [React] daisyui CSS 컴포넌트 이해하기 (2) | 2024.11.25 |
| [React] 테일윈드CSS 리액트 프로젝트 만들기 (1) | 2024.11.18 |
| [React] 리액트 컴포넌트의 CSS 스타일링 (1) | 2024.11.18 |
| [React] 이벤트 속성 이해하기 (1) | 2024.11.11 |


